
Icon Map License Keys
Icon Map Pro and Icon Map Slicer use license keys to enable advanced functionality, manage entitlement, and provide transparent usage tracking across different deployment and licensing models.
This page explains why license keys are required, how licensing works when Microsoft manages it automatically, when a license key is required, and the different ways you can apply and manage your license key, including using Power BI theme files.
Why license keys are required
Icon Map is distributed through Microsoft AppSource and runs inside Microsoft Power BI. While Microsoft provides built in support for per user licensing, many real world enterprise and commercial scenarios fall outside what Microsoft currently supports.
license keys allow Tekantis to:
- Enable Icon Map functionality for non user based licensing models
- Support usage based, capacity based, and enterprise wide licenses
- Support environments such as Power BI Report Server and GCC tenants
- Provide customers with clear visibility of usage and entitlement
- Offer flexible commercial models that Microsoft licensing does not support
For these scenarios, licensing is handled directly by Tekantis using a secure license key that is added to the Icon Map visual.
User based licensing via Microsoft AppSource
For user based licensing, no license key is required.
When Icon Map Pro or Icon Map Slicer is purchased via Microsoft AppSource, licensing is fully managed by Microsoft. license assignment, entitlement enforcement, and access are handled automatically through Microsoft 365 and Power BI administration tools.
Icon Map detects the assigned license for the signed in user at runtime, so no additional configuration is required within the visual.
For details on purchasing and managing user based licenses, see
Purchasing Icon Map licenses
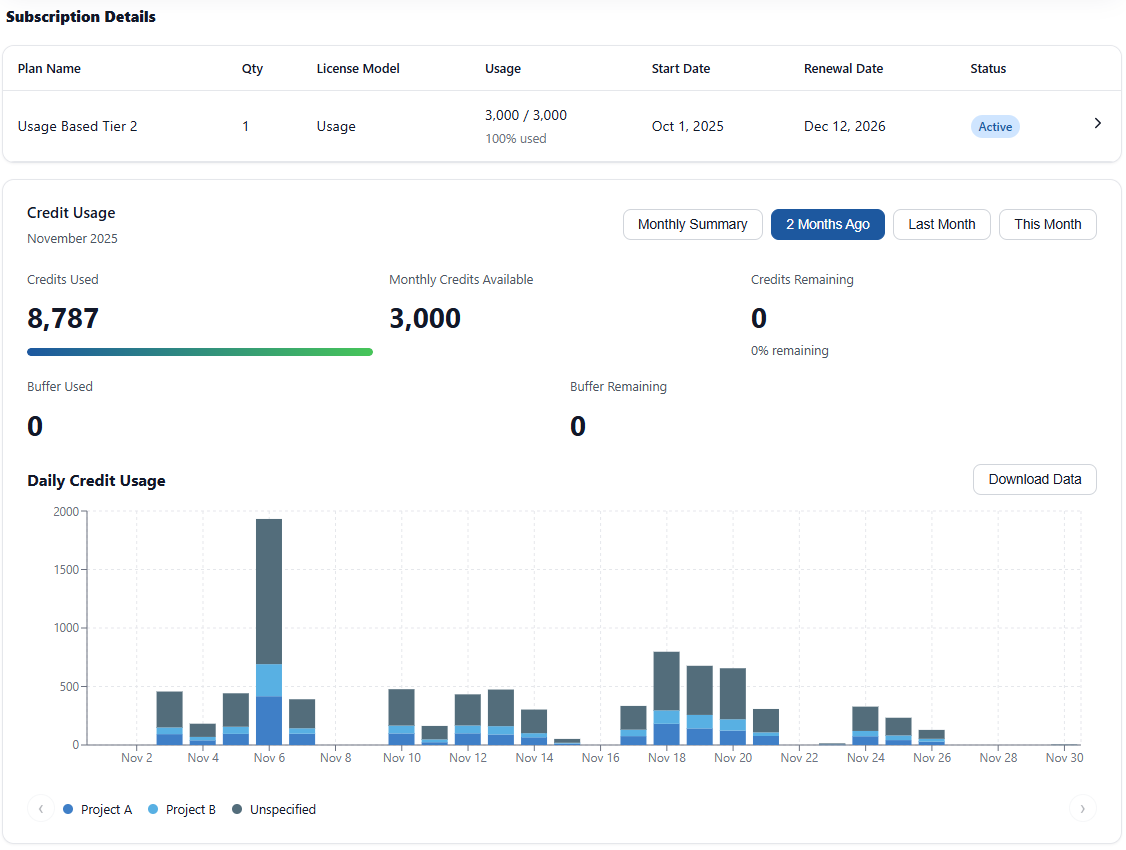
Accessing your license key in the Icon Map portal
When you purchase Icon Map under one of the license models listed above, you will receive access to the Icon Map customer portal.
From the portal you can:
- View your active subscriptions
- See license type, limits, and validity
- Access your license key
- Track usage and consumption
To find your license key:
- Sign in to the Icon Map portal
- Go to Subscriptions
- Open the relevant subscription
- View the license Details section
Your license key can then be applied directly to a visual or embedded into a Power BI theme file.
Applying a license key directly to a visual
license keys can be applied directly within Power BI Desktop or the Power BI Service.
Where to add the license key
- Select the Icon Map Pro or Icon Map Slicer visual
- Open the Format pane
- Navigate to a section called either Icon Map Pro or Icon Map Slicer
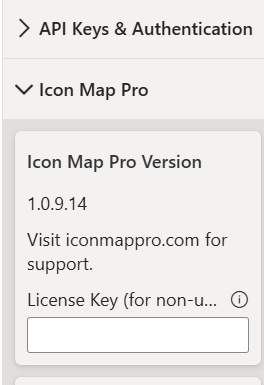
- Paste your license key into the license key field
Once entered, the visual should immediately validate the key and enable the licensed functionality. If it does not enable immediately you may need to navigate away from the report page and back again by switching to another report page tab.
Each instance of the visual is separate and sandboxed by Power BI. Hence you will unfortunately need to enter the key every time you add a new Icon Map visual. Please see using theme files below as an alternate allowing you to set the license at report level.
Optional Customer Reference field
Alongside the license key, there is an optional field called Customer Reference.
This field allows you to tag usage by any reference you choose, this could be a project code, a business unit, or an individual report reference.
If you enter a value in Customer Reference, it will be recorded alongside usage data and will be available as a filter in the Icon Map portal.
This is entirely optional, but strongly recommended for customers with multiple reports or multiple teams sharing a license.
Using Power BI theme files for license keys
Applying a license key manually works well, but if you have multiple instances of Icon Map Pro and Slicer across numberous reports, the recommended approach is to use Power BI theme JSON files.
Themes allow you to automatically apply your Icon Map license key to all Icon Map visuals in a report, removing the need for manual copy and paste each time you add the visual.
Downloading a theme file from the Icon Map portal
Icon Map provides tools to generate Power BI themes that already include your license key.
- Open the Icon Map portal
- Go to Portal → Subscriptions
- Select the license key you want to use
- In license Details, click Theme options under
“Use a Power BI Theme file (recommended)”

You can then choose one of the following options:
Download your theme
Downloads a ready to import.jsontheme fileAdd to your existing company theme
Upload an existing theme.jsonand download an updated version with the Icon Map license key injected
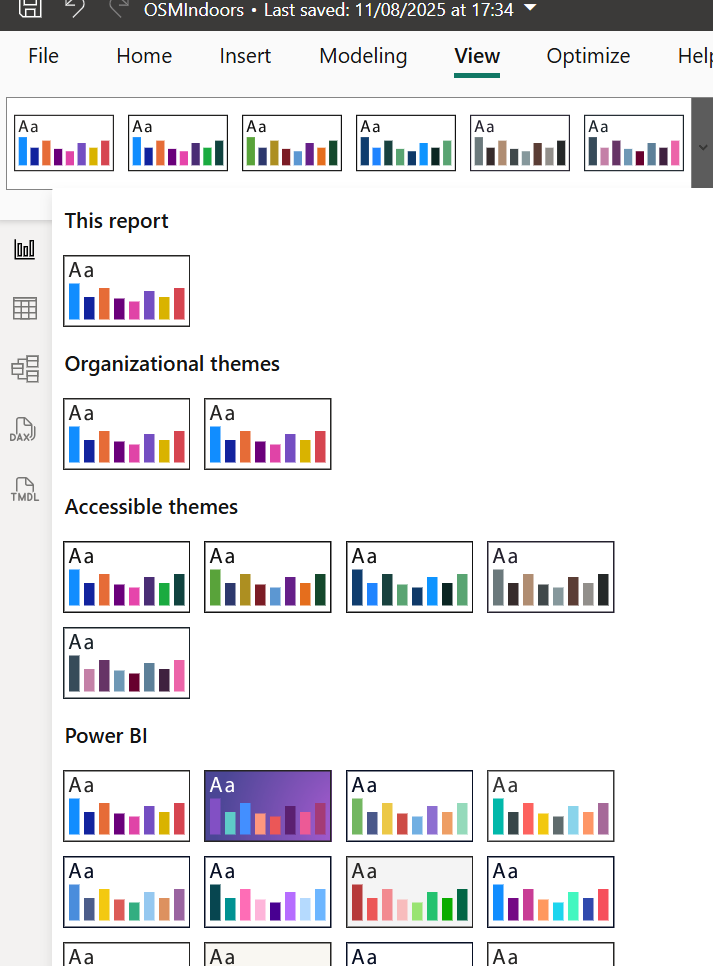
Importing the theme into Power BI Desktop
- Open your report in Power BI Desktop
- Go to View → Themes → Browse for themes
- Select the downloaded theme
.jsonfile - Power BI applies the theme to the report
Once applied, any Icon Map visuals in the report will automatically read the license key from the theme.
Adding the theme as an organisational theme in Fabric
If you want the theme available across your tenant:
- Sign in to Fabric / Power BI Service
- Open the Admin portal
- Go to Organisational themes
- Select Add theme
- Upload the theme
.jsonfile - Give it a clear name, for example
“Icon Map license” or “Icon Map license (developer)” - Enable it for the theme gallery
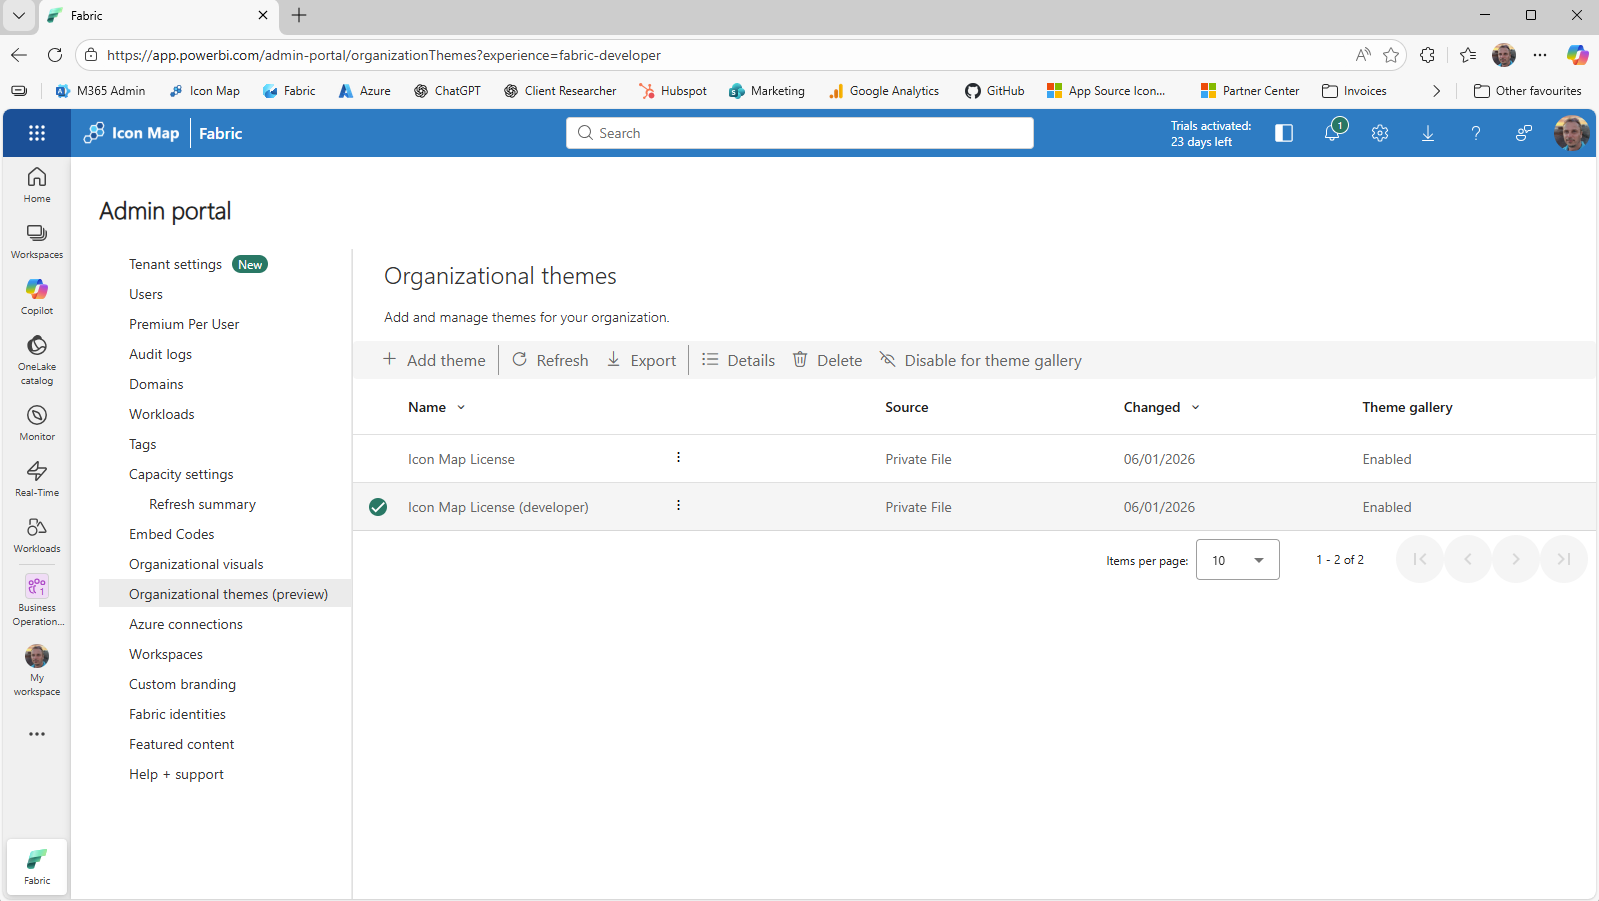
This allows users to select the theme directly from the theme gallery without manually importing files.
If you have questions about license models or need help choosing the right approach, contact the Tekantis team through the portal.